
Here's how this coffee table turned into this:

Well, the before is clear - this table is ready for a day (week or so) at the furniture spa!

First things first is to remove that ugly metal decor and sand this table down. I filled the gaps in the wood where the metal was inlaid in the shape of a square. I thought it would be glued on - but alas, it was not and required quite a bit of wood filler. Wood filler is so easy to use but it is important to let it dry sufficiently. I applied wood filler a couple of times because the square gaps in the wood were deep. I sanded it down to meet the surface of the table sides.
See the top of the table in the picture below? It's fully stained. I sanded it down to the raw wood and found out that the table top was a veneer, so I couldn't sand too much or else I'd sand the high quality top layer of wood right off. The top stained very well - Provincial by Minwax - and I am pleased with the result. This wood was very red to begin with, so I had to stain it a few times to get it to a brown color, as desired. The sides of the wood table top were a different composite (again, a veneer) and didn't take the stain well (see the finished picture below). Ron Hazelton recommends rubbing tinted shellac on to the uneven areas in order to smooth out the splotchy parts but I decided against this option. Due to the level of aging and distressing I planned for this table, I did not worry about the splotchy look on the sides of the table top as long as the top was an even Provincial color.

With the prepping done and the table top stained, I got to painting! I spend a lot of time in the preparation stage, sanding and repairing. My feeling is that you get what you put into it over the long run. This piece took 1.5 weekends and an hour or so after work during the week to prep. Perhaps I'll get speedier over time but I will not forgo the sanding…ever! I use Latex (and acrylic) paints.
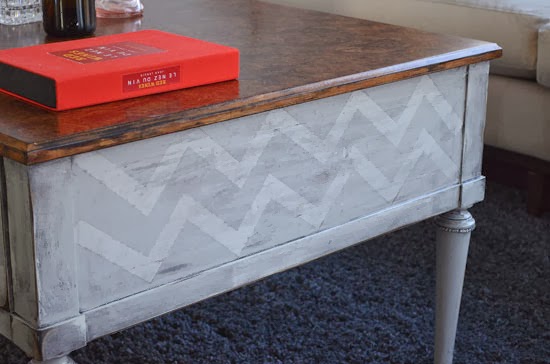
I wanted try a chevron and striped compilation like this lovely piece at Twice Lovely! Compared to her, though, I added a hefty amount of glaze (mixed with onyx stain by Minwax) and distressed the piece quite a bit more. This was my first attempt at glazing and am very happy with the final result!!
New color, no metal inlays, distressed, solid brown provincial stain, and chevron/stripes for that cutsie look - I'm in coffee table heaven!


Thanks for stopping by, Bex Wilder
No comments:
Post a Comment